In This Article
When I first spotted chickadees huddling together outside my Halifax window last February, I had no idea my simple birdhouse was completely wrong for winter survival. Turns out, there’s a massive difference between nesting box and roosting box—and understanding it could literally save birds’ lives during Canada’s brutal winters.
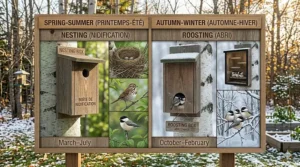
Most Canadians think one birdhouse works year-round, but that’s like expecting summer sandals to work for January snowstorms. The difference between nesting box and roosting box isn’t just about design quirks—it’s about matching the right shelter to the right season and purpose. Nesting boxes serve as breeding spaces where birds lay eggs and raise young during spring and summer, while roosting boxes function as winter shelters designed to trap heat and accommodate multiple birds sharing body warmth.
Throughout this guide, you’ll discover why Canadian birds desperately need different housing for different seasons, which species benefit most, and exactly which products deliver the best value for our climate. Whether you’re in Vancouver’s rain, Toronto’s ice, or Winnipeg’s deep freeze, you’ll learn how to transform your backyard into a year-round bird sanctuary. Let’s dive into what makes these two boxes completely different—and why both matter so much.
Quick Comparison Table
| Feature | Nesting Box | Roosting Box |
|---|---|---|
| Primary Season | Spring & Summer (March-August) | Fall & Winter (September-March) |
| Main Purpose | Egg-laying & raising young | Winter shelter & warmth |
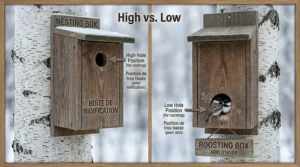
| Entrance Hole Position | Middle or top (ventilation) | Bottom (heat retention) |
| Ventilation | Multiple holes for air circulation | Minimal/sealed holes to trap heat |
| Interior Features | Flat floor, sometimes nesting material | Multiple perches at staggered heights |
| Capacity | Single family (2 adults + chicks) | Multiple birds (2-12+ individuals) |
| Wall Thickness | Standard (3/4 inch typical) | Thicker (1 inch+) for insulation |
| Typical Price (CAD) | $25-$65 | $35-$85 |
💬 Just one click – help others make better buying decisions too!😊
Top 7 Bird Boxes for Canadian Winters: Expert Analysis
1. Urban Nature Store Winter Roost
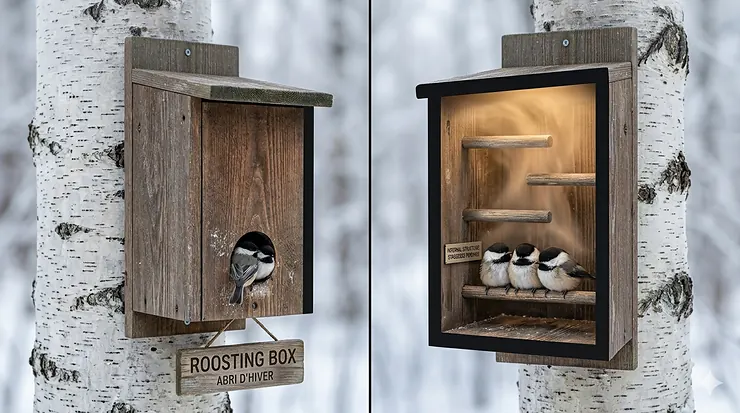
This Ontario-made white pine roosting box represents everything a Canadian winter shelter should be. Handcrafted in Canada from white pine, this roost features three staggered internal perches to accommodate roosting birds, with the entrance hole positioned at the bottom and all seams tightly sealed to prevent heat loss.
Key Specifications:
- Material: White pine (locally sourced in Canada)
- Dimensions: Designed for chickadees, nuthatches, titmice, wrens
- Features: 3 internal perches, dark-stained roof for heat absorption
- Price Range: $55-$75 CAD
Canadian Customer Feedback: Buyers from Ontario and Quebec consistently praise its durability through -25°C temperatures and easy front-wall cleaning access.
✅ Pros:
- Made in Canada for Canadian weather
- Properly sealed seams prevent drafts
- Opens easily for seasonal cleaning
❌ Cons:
- Higher price point than imported options
- Limited to smaller bird species
2. Wild Birds Unlimited Convertible Winter Roosting House
Here’s where clever design meets practicality. The Convertible Winter Roosting House transforms from a roosting box in colder months to a nesting box after winter by flipping the front panel and removing the three interior perches, handmade in Ontario from Eastern White Pine.
Key Specifications:
- Dual-purpose design (roost + nest modes)
- Eastern White Pine construction
- Removable perches for seasonal conversion
- Price Range: $65-$85 CAD
Canadian Customer Feedback: Alberta and Saskatchewan customers appreciate the year-round versatility, especially when dealing with unpredictable spring weather patterns.
✅ Pros:
- Eliminates need for two separate boxes
- Premium Canadian craftsmanship
- Includes drainage and ventilation features
❌ Cons:
- Requires manual seasonal conversion
- Premium pricing
3. MEKKAPRO Rustic Wooden Bird House (Available on Amazon.ca)
For budget-conscious Canadians, this handcrafted option delivers surprising quality. Measuring 9.8″ tall, 6.3″ wide, and 4.7″ deep, it’s ideal for chickadees, wrens, nuthatches, and titmice.
Key Specifications:
- Natural wood construction with hand-painted details
- Easy clean-out door for maintenance
- Hanging hardware included
- Price Range: $28-$38 CAD
Canadian Customer Feedback: British Columbia buyers note it holds up well in coastal rain when treated with waterproof sealant.
✅ Pros:
- Excellent value for money
- Ships quickly within Canada
- Attractive rustic aesthetic
❌ Cons:
- Better suited as nesting box (needs winterizing)
- Thinner walls than dedicated roost boxes
4. Hatching Time 6-Section Nesting Box
Perfect for backyard chicken enthusiasts, this plastic nesting box prevents hens from roosting where they shouldn’t. Made from high-density, impact-resistant plastic to prevent rust and rot, with a sloped roof specifically designed to prevent roosting.
Key Specifications:
- 6 compartments with front collection
- High-density plastic (no rust/rot)
- Roll-out design for easy egg collection
- Price Range: $115-$145 CAD
Canadian Customer Feedback: Manitoba chicken keepers report excellent performance even at -30°C.
✅ Pros:
- Weather-resistant in extreme Canadian winters
- Easy to clean and sanitize
- Prevents unwanted roosting behavior
❌ Cons:
- Designed for chickens, not wild birds
- Higher investment for multiple hens
5. Audubon Cedar Bluebird House
Specifically engineered for Eastern and Western Bluebirds common across Canada. Features a 1-9/16″ hole diameter perfect for bluebird species while excluding larger competitors.
Key Specifications:
- Cedar construction (naturally weather-resistant)
- Dimensions: 6.25″ × 6.75″ × 13″
- Front clean-out access
- Price Range: $42-$58 CAD
Canadian Customer Feedback: Ontario bluebird enthusiasts report successful multi-year nesting, though they recommend winterizing modifications for roosting use.
✅ Pros:
- Cedar naturally resists decay and insects
- Species-specific hole size
- Approved design standards
❌ Cons:
- Needs modification for winter roosting
- Ventilation too high for heat retention
6. Ware Manufacturing Chick-N-Nesting Chicken Nesting Box
While primarily marketed for bantam hens, this wooden nesting box teaches an important lesson about the difference between nesting box and roosting box design principles.
Key Specifications:
- Natural wood construction
- Side-opening clean-out
- Drainage and ventilation features
- Price Range: $32-$48 CAD
Canadian Customer Feedback: Free-range chicken owners across Canada find it durable, though some hens don’t prefer wooden boxes for roosting.
✅ Pros:
- Good construction quality
- Easy maintenance access
- Holds together well over time
❌ Cons:
- Porous wood harder to fully sanitize
- Not ideal for winter roosting without modification
7. Gilligallou Bird Lake & Cabin Bluebird House (Canadian Retailer)
This Almonte, Ontario retailer offers a premium bluebird house with predator guard and metal roof, showcasing Canadian craftsmanship.
Key Specifications:
- Clear-coated cedar
- Metal roof with forest green accents
- Integrated predator guard
- Price Range: $62-$78 CAD
Canadian Customer Feedback: Local buyers appreciate supporting Canadian small business and the pickup option in Almonte.
✅ Pros:
- Premium Canadian materials
- Predator protection included
- Supports local Ontario business
❌ Cons:
- Custom manufacturing may delay delivery
- Limited to bluebird specifications
What Is the Difference Between Nesting Box and Roosting Box?
The difference between nesting box and roosting box comes down to three fundamental factors: purpose, season, and survival strategy.
Nest boxes are meant for laying eggs and raising young, and birds abandon them once they’re finished with both tasks, while roost boxes are typically larger to keep multiple birds warm inside during winter, with thicker walls for better insulation and fewer ventilation holes.
Think of it this way: a nesting box is a nursery designed for privacy, ventilation, and safety during the breeding season. Parents need space to incubate eggs and feed chicks, with plenty of airflow to prevent overheating on warm summer days. The entrance hole sits higher to prevent predators from reaching in, and ventilation holes dot the sides to keep fresh air circulating.
A roosting box, however, functions like a winter survival pod. The entrance hole is positioned near the bottom so rising warmth doesn’t escape, and it has fewer ventilation holes to prevent body heat from escaping, with staggered wooden dowel perches inside allowing multiple birds to cluster together. During harsh Canadian winters where temperatures regularly plunge below -20°C, cavity-roosting birds like chickadees and nuthatches huddle together, sharing metabolic heat to survive the night.
The difference between nesting box and roosting box isn’t just academic—it determines whether birds thrive or struggle through Canada’s seasonal extremes. Installing the wrong box at the wrong time is like offering a screen door in a blizzard: technically it’s shelter, but functionally useless.
Do Birds Use Roosting Boxes in Winter?
Absolutely—and for many Canadian cavity-nesting species, winter roosting behavior represents the difference between survival and freezing to death.
Nest boxes offer shelter from rain, snow, wind, and cold during winter, and sometimes more than a dozen birds will pile into a single box to conserve heat, though their smooth sides and open interiors don’t offer ideal perching surfaces.
But not all birds roost the same way. Bluebirds and nuthatches don’t mind a crowd and sometimes 10-12 individuals will cram into a cavity for the night for protection from the elements, while chickadees and woodpeckers are more likely to roost on their own. This behavioural difference shapes which birds will actually use your roosting box through Canadian winters.
Research shows impressive survival advantages. During extreme cold snaps in southern Ontario, where temperatures hit -25°C or lower, roosting birds can raise the internal box temperature by more than 10°C through shared body heat alone. That thermal advantage translates directly into energy savings—less shivering, less calorie burning, better chances of making it to sunrise.
Interestingly, do birds use roosting boxes in winter depends heavily on species and weather severity. Chickadees might roost solo on milder -5°C nights but pile in together when the mercury drops to -20°C. Bluebirds, facing population crashes during severe winters, benefit enormously from communal roosting opportunities.
Canadian bird enthusiasts across provinces report consistent winter usage when boxes are properly placed and maintained. One Barrie, Ontario resident documented up to eight chickadees using a single roosting box during January cold snaps—proof that when designed correctly, these shelters become winter survival tools, not just decorative yard features.
Where to Place Winter Roosting Box for Maximum Bird Use
Location determines everything when it comes to winter roosting box effectiveness. Place it wrong, and birds won’t touch it. Position it correctly, and you’ll host nightly huddles of grateful visitors.
Mount roosting boxes 10 feet or higher, as most birds feel safer the higher up they are, on a south-facing tree or pole at heights of 6-15 feet from the ground in areas sheltered from wind and rain. For Canadian conditions, here’s what works:
Optimal Placement Strategy:
Height Considerations: Mount between 1.8-4.5 metres (6-15 feet) off the ground. Too low invites raccoons and cats; too high makes maintenance impossible. Most successful Canadian installations sit around 2.5-3 metres (8-10 feet).
Directional Orientation: Face the entrance away from prevailing winds—typically northeast in most Canadian regions. A south-facing box captures maximum winter sun, with the dark-stained roof absorbing warmth during precious daylight hours.
Mounting Options:
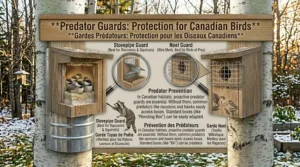
- Pole mounting with predator baffles works best (prevents climbing predators)
- Tree mounting on trunks (not swaying branches)
- Building attachment under sheltered eaves
Microclimate Selection: Position near natural windbreaks like evergreen trees, garage walls, or fence lines. These break bitter winds while still allowing easy flight access. Avoid completely exposed locations—a roosting box on an open post in a prairie field will be colder inside than outside due to wind chill.
Proximity to Food Sources: Where to place winter roosting box should consider food availability. Ideally, position within 15-30 metres (50-100 feet) of winter feeders. Birds feeding late into dusk can quickly duck into shelter as temperatures plummet after sunset.
For Canadian winters specifically, consider regional variations: coastal British Columbia needs more rain protection, Prairie provinces require superior wind resistance, and Atlantic Canada benefits from south-facing positions maximizing limited winter sun.
Multi-Bird Winter Shelter Box Design Features
The best multi-bird winter shelter box transforms a simple wooden structure into a life-saving thermal refuge through specific design elements.
Essential Design Components:
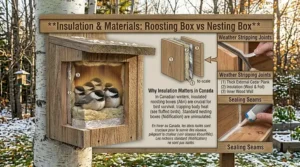
Thicker Walls for Insulation: Standard nesting boxes use 1.9 cm (3/4 inch) boards; quality roosting boxes upgrade to 2.5 cm (1 inch) or thicker. This extra wood mass stores heat and buffers against temperature swings. Eastern White Pine, commonly used in Canadian-made boxes, provides excellent insulation while remaining workable.
Strategic Entrance Placement: The entrance hole sits near the bottom of the box so the rising warmth doesn’t escape, unlike nest boxes where entrance holes sit higher. Hot air rises—by positioning the entry low, heat accumulates in the upper chamber where birds cluster on perches.
Internal Perch Configuration: A proper multi-bird winter shelter box includes 3-5 wooden dowels (approximately 1 cm diameter) staggered at different heights. This stair-step arrangement lets birds pack together efficiently. Some designs also roughen interior walls, allowing woodpeckers to cling vertically if they prefer.
Minimal Ventilation: Where nesting boxes might have 4-6 ventilation holes for airflow, roosting boxes seal most openings. One or two small drainage holes in floor corners provide fresh air without creating drafts. You can plug extra holes with foam weatherstripping for Canadian winters.
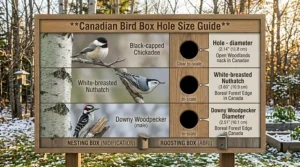
Entrance Hole Sizing:
- 1.25-1.5 inches (3.2-3.8 cm): Chickadees, wrens, nuthatches
- 1.5-2 inches (3.8-5 cm): Small woodpeckers, titmice, larger groups
- Avoid larger holes: Starlings and aggressive species can dominate
Accessible Cleaning Panel: Top-hinged or side-opening panels allow spring cleaning after roosting season ends. Accumulated droppings and feather dust need removal before converting to nesting mode or storage.
Optional Thermal Enhancements: Some Canadian birders add thin cork sheeting to interior walls or place a small amount of wood shavings on the floor for extra insulation. However, avoid blocking drainage or creating moisture traps.
The most effective multi-bird winter shelter box combines all these features, creating a miniature thermal fortress that can accommodate 6-12 birds depending on species mix and weather severity.
Seasonal Birdhouse Usage Across Canadian Climates
Understanding seasonal birdhouse usage patterns helps Canadian bird enthusiasts optimize their backyard habitat year-round.
Spring Migration Season (March-May):
Tree swallows and other aerial insectivores have seen population declines in Nova Scotia and Prince Edward Island since the 1970s, and they are cavity-nesters that like to live in holes inside trees, making nesting boxes valuable alternatives when natural cavities are scarce.
As temperatures climb above freezing, returning migrants inspect potential nest sites. Early March brings bluebirds to southern Ontario and British Columbia’s Lower Mainland. By mid-April, tree swallows arrive across most provinces. This transition period demands boxes be cleaned and ready—remove winter roosting debris, check structural integrity, and ensure entrance holes haven’t been enlarged by woodpeckers or squirrels.
Summer Breeding Season (May-August):
Peak nesting activity dominates. Parent birds make hundreds of feeding trips daily, requiring excellent ventilation to prevent nestling overheating. In Prairie provinces where summer temperatures can hit 30°C+, proper airflow becomes critical. This is when the difference between nesting box and roosting box matters most—those ventilation holes save lives in July but would kill birds in January.
Seasonal birdhouse usage during breeding involves single-family occupancy. Unlike winter communal roosting, nesting boxes house only one pair plus their offspring. Multiple broods are common; bluebirds often raise 2-3 families per summer in successful boxes.
Fall Transition (September-October):
As breeding ends, cavity-nesters begin scouting winter shelter. This transition window offers perfect timing for:
- Cleaning out summer nests
- Blocking excess ventilation holes
- Adding roosting perches
- Potentially flipping entrance panels lower
Many Canadian birders leave boxes up year-round but modify them in autumn. Some people modify their empty nest boxes for winter to make them better for roosting by turning the front panel around so the entrance hole is at the bottom, adding twigs for perches, and plugging ventilation holes.
Winter Survival Season (November-March):
Peak roosting activity. Biologists have measured tiny birds raising the temperature inside a snug roost by more than 10°F simply by sleeping together, enough to tip the balance between survival and exhaustion over one long night.
Canadian winters drive dramatic seasonal birdhouse usage changes. Birds that nested solo in summer now huddle in groups. A Toronto chickadee might roost alone at -5°C but join five companions at -25°C. Extreme events—like the polar vortex events hitting Ontario and Quebec—see maximum box occupancy as birds prioritize survival over personal space.
Regional Variations:
- Coastal BC: Mild, wet winters mean less communal roosting, more solo usage
- Prairies: Extreme cold drives heavy winter box usage; wind protection critical
- Ontario/Quebec: Highly variable; boxes get used heavily during cold snaps
- Atlantic Canada: Moderate use; combination of cold and moisture protection needed
Seasonal birdhouse usage optimization means thinking like a bird—what shelter type does this specific season and location demand?
Winter Bird Roosting Behavior: Canadian Species Guide
Winter bird roosting behavior varies dramatically by species, and knowing these patterns helps Canadian homeowners provide appropriate shelter.
Communal Roosters (Group Huddle Species):
Bluebirds lead the communal roosting championship. During extreme Ontario winters, researchers documented up to 21 bluebirds crammed into a single nestbox. Bluebirds spend about 50% of their lives roosting, and during severe winters, large numbers of bluebirds can die—for example, an estimated 44% of bluebirds in one NW Tennessee area died during the winter of 1960-61. For Canadian populations facing similar risks, roosting boxes represent critical survival infrastructure.
Tree Swallows pile in enthusiastically. Though most migrate south, late-departing or lingering individuals will crowd into cavities together. Their communal winter bird roosting behavior resembles their summer colony nesting—they’re comfortable in tight quarters.
Nuthatches (White-breasted and Red-breasted species common across Canada) roost both solitarily and communally depending on weather. Wrens and nuthatches can often be found roosting together to keep warm on a cold night, and bluebirds often pile in together to stay warm. This flexibility makes them reliable roosting box users.
Chickadees (Black-capped across most of Canada, Boreal in northern regions) show interesting winter bird roosting behavior: they’ll roost alone on mild nights but join others during severe cold. Their metabolic trick—dropping body temperature by 10-15°C overnight to conserve energy—works better in sheltered cavities than exposed branches.
Solitary or Occasional Roosters:
Woodpeckers (Downy, Hairy, and others) typically roost alone even in winter. Woodpeckers often carve their own private room cavities and sleep alone even if they nest nearby with a mate, and some chickadees roost by themselves on milder nights, switching to shared cavity stacking only when the weather turns dangerous. They excavate their own roosting cavities and rarely share space.
Titmice (found in southern Ontario and parts of BC) show variable behavior—sometimes solo, sometimes joining mixed flocks in roosting boxes.
Non-Cavity Roosters (Don’t Use Boxes):
Cardinals, Blue Jays, and mockingbirds don’t roost in cavities no matter how nasty the weather gets, preferring dense evergreen cover instead. No point installing roosting boxes for these species—they’ll ignore them entirely.
Behavioural Patterns:
Winter bird roosting behavior follows predictable daily rhythms. Birds enter cavities just before sunset (30-45 minutes before dark), sometimes making several entry/exit trips before settling. They leave promptly at sunrise. Evidence of roosting includes downy feathers left during preening, small droppings, and sometimes seed hulls.
Temperature Thresholds:
Canadian observations show roosting intensity increases dramatically below -15°C. Above -5°C, many species roost individually. Between -5°C and -15°C represents a transition zone where group roosting becomes more common. Below -20°C, maximum occupancy occurs as survival trumps all other considerations.
Understanding these species-specific patterns helps match the right box design to the right birds. Bluebird-focused boxes need larger capacity for groups; chickadee boxes can be smaller but should accommodate 4-6 individuals during extreme weather.
Communal Roosting Habits: Science Behind Bird Survival
Communal roosting habits represent one of nature’s most elegant survival strategies, backed by decades of scientific research.
Three main benefits underlie communal roosting in birds: reduction in thermoregulation demands, decrease in predation risk, and increase in foraging efficiency. Let’s unpack how each advantage plays out in Canadian winter conditions.
Thermoregulation Benefits:
Birds in a communal roost can reduce the impact of wind and cold weather by sharing body heat through huddling, which reduces the overall energy demand of thermoregulation, as demonstrated by black-billed magpies forming largest roosts during winter to improve their reactivity by sharing body heat.
The physics are straightforward: more bodies produce more heat, and a tight cluster minimizes exposed surface area. A single chickadee roosting alone must maintain its 105°F body temperature against -20°C air—a brutal energy drain. Six chickadees huddled together create a microclimate 10-15°C warmer than ambient temperature, cutting individual energy expenditure by up to 30%.
Canadian studies on roosting black-capped chickadees found that communal roosting habits reduced nocturnal hypothermia severity. Birds could enter controlled hypothermia (dropping body temperature to conserve energy) less deeply when roosting communally, making morning warm-up faster and less risky.
Predation Protection:
The “many eyes” principle applies even in darkness. Owls, weasels, and other nocturnal predators find it harder to surprise a group. The dilution effect also operates—any individual bird faces lower probability of being the one caught. For bluebirds roosting communally in boxes mounted on poles with baffles, predation risk drops significantly compared to solo roosting in exposed cavities.
Information Exchange:
The information center hypothesis states that bird assemblages such as communal roosts act as information hubs for distributing knowledge about food source location, allowing flock members without knowledge to follow knowledgeable members to find good feeding locations.
In Canadian contexts, this means successful foragers at backyard feeders effectively “advertise” these food sources to roost-mates. Come morning, birds depart together and unsuccessful individuals follow successful ones to productive feeding sites—your suet feeders, for instance.
Social Dynamics:
Communal roosting habits aren’t entirely egalitarian. Communal roosts have demonstrated a hierarchy where older members and better foragers nest in the interior, forcing younger birds to sleep on the outer edges. This age-stratification appears in multi-bird winter shelter boxes too, with dominant individuals claiming prime central perching spots while subordinates occupy less favorable positions.
Energy Calculations:
A chickadee weighing about 11 grams needs roughly 10,000 calories daily in winter—equivalent to 65,000 calories per kilogram of body weight. Overnight roosting in a communal box versus exposed solo roosting can mean the difference between needing to consume 150 sunflower seeds versus 200 seeds daily. Over a long Canadian winter, those savings accumulate into significant survival advantages.
Canadian Research Context:
University of British Columbia researchers studying communal roosting found it positively correlated with body mass and foraging strategies. For Canadian cavity-nesters facing resource scarcity and extreme temperatures, communal roosting habits evolved as critical adaptations—not optional behaviours but survival necessities during our harshest months.
Converting Nesting Boxes to Roosting Boxes
Got summer nesting boxes already installed? Perfect—you can convert them for winter use rather than buying separate roosting boxes. Here’s how Canadian birders successfully modify nesting boxes for seasonal birdhouse usage.
Step-by-Step Conversion Process:
1. Timing the Transition (Late September-Early October):
Wait until breeding season definitively ends. Most Canadian cavity-nesters finish by late August, but stragglers and second broods might extend into September. Once boxes are empty for two weeks, conversion time arrives.
2. Deep Clean Before Modification:
Remove all old nesting material, scrape out debris, and inspect for wasps, mice, or other squatters. Clean the roost box regularly, removing feces, feathers, dirt, and other debris that’s built up over time. Use a mild soap solution, let dry completely, then proceed with modifications.
3. Seal Ventilation Holes:
Nesting boxes typically have 4-6 ventilation holes for summer airflow. Block ventilation holes using foam weatherstripping, and add dried grass, hay, or pine shavings as additional insulation inside. Small squares of foam weatherstripping (available at any Canadian hardware store) work perfectly—they seal gaps without damaging wood.
4. Lower the Entrance (Optional but Effective):
If your nesting box has a removable front panel (many do), flip it upside down so the entrance hole sits near the bottom rather than middle/top. This single modification dramatically improves heat retention. Turn the front panel around so the entrance hole is at the bottom, keeping more heat trapped inside as heat rises.
Not all boxes allow this—if yours doesn’t, don’t force it. The other modifications still provide substantial winter bird roosting behavior benefits.
5. Install Interior Perches:
Add 3-5 wooden dowels (6-10mm diameter) as roosting perches. Stagger them at different heights:
- Bottom perch: 5 cm above floor
- Middle perch: 10-12 cm above floor
- Top perch: 15-18 cm above floor
Drill small holes on opposite walls, insert dowels, and let them friction-fit (or add a tiny drop of wood glue). These transform a flat-floored nesting space into a multi-level roosting facility.
6. Add Floor Insulation (Optional):
Add a layer of moss or wood chips to the bottom for better insulation. About 2.5-5 cm (1-2 inches) of natural wood shavings provides thermal mass and comfort. Avoid cedar shavings (aromatic oils can irritate) and sawdust (too fine, creates respiratory issues).
7. Check and Seal Gaps:
Inspect seams, corners, and the roof junction. Use caulk or tape to cover over any cracks in the roost box to prevent heat loss. Silicone caulk works well for Canadian freeze-thaw cycles.
Seasonal Birdhouse Usage Reversal (Spring):
Come March, reverse the process:
- Remove perches (store for next winter)
- Clear out floor material
- Unblock ventilation holes
- Flip entrance panel back to standard position
- Final cleaning before nesting season
This seasonal birdhouse usage pattern maximizes year-round utility from a single box investment. Many Canadian birders maintain dedicated roosting boxes while also converting summer nesting boxes, providing maximum shelter options across their property.
Regional Modifications for Canadian Climates:
- Prairie Provinces: Extra sealing critical; winds penetrate smallest gaps
- Coastal BC: Focus more on rain protection than extreme insulation
- Ontario/Quebec: Standard modifications work well
- Atlantic Canada: Combine insulation with moisture barriers
By understanding the difference between nesting box and roosting box requirements, then modifying existing structures seasonally, you create optimal habitat without doubling equipment costs.
DIY Roosting Box Plans for Canadian Climates
Building your own roosting box offers customization for specific Canadian conditions while keeping costs minimal. One Halifax resident spent no more than $20 in materials to build their own roosting box, taking just 30 minutes to assemble using scrap wood, an entrance hole, and a pivoting side panel for easy cleaning.
Materials List (Available at Any Canadian Hardware Store):
Wood Components:
- 1 × 25 cm × 183 cm (1″ × 10″ × 6′) Eastern White Pine or cedar board (yields one roosting box)
- Alternative: Reclaimed fence boards, untreated pallet wood
Hardware:
- 16 wood screws (4 cm / 1.5″ exterior grade)
- 2 small hinges for cleaning door
- 1 hook-and-eye latch
- Wood glue (exterior grade)
Tools Required:
- Hand saw or circular saw
- Drill with bits (including 3.8 cm / 1.5″ hole saw)
- Screwdriver
- Measuring tape
- Pencil
Cutting Measurements (Based on Cornell Lab Guidelines):
- Front & Back: 20 cm × 35 cm (8″ × 14″)
- Sides: 20 cm × 33 cm (8″ × 13″) — angle top edge 15° for roof slope
- Floor: 18 cm × 18 cm (7″ × 7″)
- Roof: 20 cm × 25 cm (8″ × 10″)
Assembly Steps:
1. Cut entrance hole: Drill 3.8 cm (1.5″) hole centered 5 cm (2″) from bottom of front panel—this low placement is crucial for the difference between nesting box and roosting box thermal performance.
2. Create ventilation: Drill two 6mm (1/4″) drainage holes in floor corners. Skip upper ventilation entirely for winter boxes.
3. Add perch holes: Drill 8mm (5/16″) holes on opposite side panels at heights of 8 cm, 15 cm, and 22 cm from floor. Insert 10 cm dowel pieces.
4. Assemble walls: Apply wood glue to edges, screw side panels to back panel, then attach front panel (leave one side hinged for cleaning access).
5. Attach floor: Screw floor piece inside bottom of assembled walls.
6. Mount roof: Attach with 15° slope directing water toward front. Overhang front by 2-3 cm for rain protection.
7. Weatherproofing: Apply linseed oil or non-toxic exterior stain. Never paint interior surfaces. Optional: stain roof dark brown to absorb solar heat.
Canadian Climate Adaptations:
For Prairie Wind Resistance:
- Use thicker 3 cm (1.25″) lumber
- Add extra screws at stress points
- Caulk all seams before assembly
For Coastal Moisture:
- Use cedar or treated lumber exterior surfaces
- Add wider roof overhang (5 cm / 2″)
- Apply multiple coats of weatherproofing
For Extreme Cold (Manitoba, Saskatchewan, Northern regions):
- Line interior walls with thin cork sheeting
- Use maximum wall thickness available
- Consider double-wall construction with insulation gap
Mounting Hardware:
Add heavy-duty eyebolts to roof or back panel. Mount on:
- Metal poles with predator baffles (best option)
- Tree trunks using lag bolts and washers
- Building walls under sheltered eaves
Position 2.5-3.5 metres (8-12 feet) high, facing southeast to capture morning sun while avoiding harsh west winds.
Cost Breakdown (Canadian Pricing):
- Lumber: $8-$12 CAD
- Hardware: $5-$8 CAD
- Optional weatherproofing: $5-$10 CAD
- Total: $18-$30 CAD per roosting box
Compare this to $55-$85 CAD for commercial roosting boxes—DIY saves 60-75% while allowing full customization for your specific Canadian location and target species.
Free plans are available from the Canadian Wildlife Federation and Cornell Lab’s NestWatch program, both offering proven designs tested across North American climates.

Frequently Asked Questions
❓ What is the main difference between nesting box and roosting box for Canadian birds?
❓ Do birds use roosting boxes in winter across all Canadian provinces?
❓ Where to place winter roosting box for best results in Canada?
❓ Can I convert my summer nesting box into a winter roosting box?
❓ Which multi-bird winter shelter box works best for severe Canadian winters?
Conclusion: Choosing the Right Box for Canadian Birds
Understanding the difference between nesting box and roosting box transforms from academic knowledge to practical conservation when you see chickadees huddling together outside your window on a -25°C February night.
The core insight isn’t complicated: birds need different shelter for different seasons, just like Canadians need different clothing for July versus January. Nesting boxes support reproduction with privacy and airflow; roosting boxes enable winter survival through heat retention and communal warmth. Both serve critical functions in the annual cycle of cavity-nesting species facing our climate extremes.
For Canadian homeowners committed to backyard bird conservation, the optimal approach involves:
Immediate Action Items:
- Install or modify at least one roosting box before December
- Position it properly (2.5-3m high, south-facing, wind-sheltered)
- Add seasonal food sources (suet feeders, black oil sunflower seeds)
- Provide unfrozen water with heated birdbaths
- Maintain cleaning schedule (fall and spring)
Year-Round Strategy:
- Dedicate specific boxes to roosting (leave modified October-March)
- Maintain separate nesting boxes for spring/summer
- Or convert the same boxes seasonally as described earlier
The species you’ll support—chickadees navigating Prairie winters, bluebirds surviving Ontario cold snaps, nuthatches weathering Maritime storms—depend on these thermal refuges when temperatures plummet and survival margins narrow to mere degrees and hours.
Whether you invest in premium Canadian-made roosting boxes like the Urban Nature Store Winter Roost, choose convertible options from Wild Birds Unlimited, or build DIY versions from $20 in lumber, you’re providing infrastructure that measurably improves winter survival rates for multiple species.
The difference between nesting box and roosting box represents more than construction details—it reflects understanding bird biology, respecting seasonal needs, and taking responsibility for wildlife thriving in spaces we’ve altered. Every properly placed roosting box becomes a miniature life-support system when January windchills hit -35°C.
Your backyard can be more than scenery. It can be sanctuary.
✨ Don’t Miss These Exclusive Deals!
🔍 Take your backyard bird habitat to the next level with these carefully selected products available in Canada. Click on any highlighted item to check current pricing and availability on Amazon.ca. These tools will help you create authentic year-round bird sanctuaries your feathered neighbours will desperately need!
Recommended for You
- 7 Best Roosting Box for Canadian Winter 2026
- When to Put Up Purple Martin House: 7 Perfect Timing Tips (2026)
- 7 Best Purple Martin Houses for Beginners Canada 20262
Disclaimer: This article contains affiliate links to Amazon.ca. If you purchase products through these links, we may earn a small commission at no additional cost to you.
✨ Found this helpful? Share it with your friends! 💬🤗