In This Article
I’ll never forget the first time I spotted a downy woodpecker exploring my backyard in Ontario. That distinctive black-and-white pattern, the cheerful “pik” call, and the rhythmic drumming against my old oak tree sparked an obsession I didn’t see coming. But here’s what surprised me most: getting them to actually nest nearby required more than just wishful thinking.
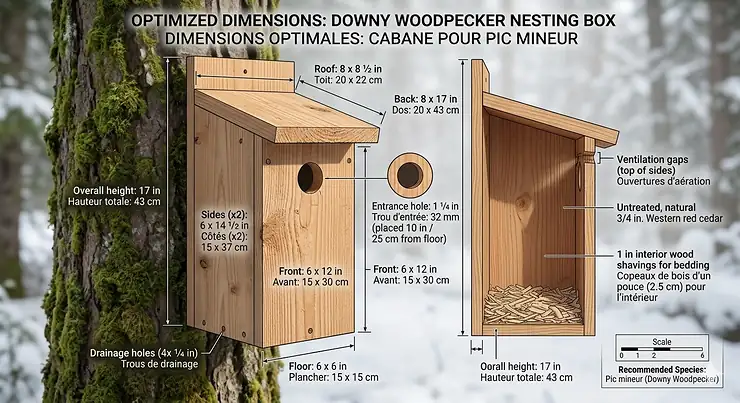
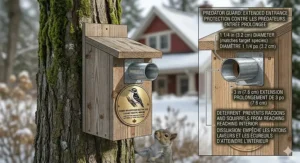
A downy woodpecker nesting box is a specially designed cavity that mimics the natural tree holes these birds excavate in the wild. These compact structures provide safe breeding habitats for North America’s smallest woodpecker species, featuring precise entrance holes (typically 1.25 to 1.5 inches), proper ventilation, and wood chip bedding that encourages natural excavation behaviour. In Canada, where downy woodpeckers face harsh winters and habitat loss from urban development, well-designed nesting boxes serve as critical alternatives to dead trees that are often removed from residential areas.
What makes Canadian installations unique? Our climate demands weather-resistant cedar construction, proper orientation to handle prevailing winds, and strategic placement that accounts for our shorter breeding season. From British Columbia’s coastal forests to Ontario’s deciduous woodlands, these remarkable birds have adapted to our diverse landscapes—but they need our help to thrive in increasingly developed areas. According to Hinterland Who’s Who, downy woodpecker populations have actually increased across Canada over the past 30 years, partly thanks to thoughtful habitat management by backyard birders.
Whether you’re a seasoned birder in Quebec or a curious newcomer in Alberta, understanding what makes an effective downy woodpecker nesting box can transform your yard into a breeding sanctuary. The right box isn’t just shelter—it’s an invitation to witness one of nature’s most fascinating nesting rituals, complete with drumming courtship displays and dedicated parental care. You’re about to discover the exact specifications, placements, and products that work in Canadian conditions, backed by real customer experiences and ornithological research.
Quick Comparison Table: Top Downy Woodpecker Boxes Available in Canada
| Product Name | Material | Entrance Hole | Price (CAD) | Ships to Canada | Best For |
|---|---|---|---|---|---|
| Woodlink WOODPECK Cedar House | Inland Red Cedar | 2.25″ | $48-65 | ✅ Amazon.ca | Hairy & Red-bellied |
| SISTERBIRD 2-Pack Cedar Box | Western Red Cedar | 1.5″ | $34-42 | ✅ Amazon.ca | Budget multi-box |
| Urban Nature Handmade Box | White Pine | 1.5″ | $55-70 | ✅ Canadian Made | Premium downy specific |
| Nature’s Way Cedar Box | Cedar | 1.375″ | $38-52 | ✅ Via retailers | Standard nesting |
| WildYard Cedar Box | Western Cedar | 1.5″ | $45-60 | ✅ Amazon.ca | Year-round roosting |
| All Things Cedar Custom | Western Red Cedar | Custom | $60-85 | ✅ Canadian retailer | Handcrafted quality |
| DIY Cedar Kit | Cedar lumber | Custom | $15-25 | ✅ Materials local | Budget DIY option |
💬 Just one click – help others make better buying decisions too!😊
Top 7 Downy Woodpecker Nesting Boxes: Expert Analysis 🏆
1. Woodlink WOODPECK Cedar Woodpecker House
This ornithologically designed nesting box represents the gold standard for larger woodpecker species, though it’s actually oversized for downy woodpeckers specifically. The Woodlink WOODPECK comes fully assembled with a 2.25-inch entrance hole, making it better suited for hairy woodpeckers, red-bellied woodpeckers, and red-headed woodpeckers in Canadian habitats.
Key Specifications:
- Handcrafted from kiln-dried inland red cedar
- 2.25″ entrance diameter with included cedar chips
- Easy-open front panel with metal latch
- Dimensions: 7″ x 9.5″ x 15.125″H
Canadian Pricing: $48-65 CAD on Amazon.ca, with occasional stock limitations from third-party sellers. Shipping within Canada typically takes 5-10 business days depending on your province.
Customer Feedback from Canadians: Buyers in Ontario and British Columbia report excellent weather resistance through harsh winters. One reviewer from Saskatoon noted that while downy woodpeckers roosted in the box during winter, red-bellied woodpeckers successfully nested in spring. The cedar construction holds up beautifully against Canadian freeze-thaw cycles without splitting or warping.
✅ Pros:
- Premium cedar naturally resists rot and insects
- Includes essential wood chips for excavation behaviour
- Fully assembled and mounting-ready
- Proven multi-season durability in Canadian climates
❌ Cons:
- Entrance hole too large for optimal downy woodpecker use
- Higher price point than budget options
- Limited Canadian stock causes occasional delays
2. SISTERBIRD 2-Pack Cedar Bird Houses with Copper Guard
The SISTERBIRD 2-Pack offers exceptional value for Canadian backyard birders wanting to establish multiple nesting sites. These versatile boxes feature 1.5-inch entrance holes perfectly sized for downy woodpeckers, with copper predator guards that prevent squirrels and larger birds from enlarging openings.
Key Specifications:
- Untreated Western Red Cedar construction
- 1.5″ entrance with protective copper ring
- Easy assembly with included screws
- Front-opening cleaning door
Canadian Pricing: $34-42 CAD on Amazon.ca, representing excellent cost-per-box value. Ships quickly through Amazon fulfillment centres in Canada, avoiding customs delays.
Customer Feedback from Canadians: Manitoba customers particularly appreciate the two-box approach, allowing strategic placement at different heights and locations. A reviewer from New Brunswick successfully attracted both downy woodpeckers and chickadees across multiple breeding seasons. The copper guards remain tarnish-free even in humid coastal climates.
✅ Pros:
- Best value for establishing multiple sites
- Perfect entrance size for downies
- Copper guards prevent hole enlargement
- Quick Canadian shipping via Amazon fulfillment
❌ Cons:
- Requires assembly (about 15 minutes per box)
- Untreated cedar will weather to grey naturally
- No included wood chips for excavation
3. Urban Nature Store Handmade Downy Woodpecker Birdhouse
Crafted specifically for Canadian conditions by a Canadian company, this Urban Nature Store box represents premium domestic manufacturing. Hand-built from white pine with glued-and-screwed joints, these boxes feature scored interior walls that give fledglings easy footholds—a detail often overlooked in mass-produced alternatives.
Key Specifications:
- Canadian-made white pine construction
- 1.5″ entrance hole optimized for downies
- Scored interior walls for grip
- Caulked roofline prevents leaking
- Downward-opening front with turn-latch
Canadian Pricing: $55-70 CAD directly from Urban Nature Store in St. Catharines, Ontario. Free shipping on orders over $125 CAD, with no customs concerns for Canadian buyers.
Customer Feedback from Canadians: Southern Ontario birders report that the scored walls make a measurable difference in fledgling success rates. One customer in Hamilton observed downy woodpeckers using the box for winter roosting before successfully breeding the following spring. The construction quality exceeds imported alternatives, with joints remaining tight through multiple freeze-thaw cycles.
✅ Pros:
- Purpose-built for downy woodpeckers specifically
- Canadian craftsmanship with local materials
- Scored walls aid fledgling development
- Supports domestic small business
❌ Cons:
- Higher price reflects handcrafted quality
- Limited to one Canadian retailer
- Shipping costs for orders under $125
4. Nature’s Way Cedar Bluebird/Woodpecker Box
This versatile cavity nesting box woodpecker design from Nature’s Way serves multiple small species with its 1.375-inch entrance. While marketed primarily for bluebirds, the dimensions work beautifully for downy woodpeckers seeking breeding habitat in Canadian backyards.
Key Specifications:
- Aromatic red cedar construction
- 1.375″ entrance (smaller than standard bluebird)
- Viewing window on side panel
- Removable floor for cleaning
Canadian Pricing: $38-52 CAD through various Canadian garden centres and online retailers. Availability varies regionally, with better stock in Eastern provinces.
Customer Feedback from Canadians: Quebec customers appreciate the slightly smaller entrance that deters European starlings while accommodating downy woodpeckers perfectly. The viewing window allows monitoring without disturbing nesting birds, though some birders cover it during breeding season for additional privacy.
✅ Pros:
- Entrance size ideal for downy woodpeckers
- Viewing window aids monitoring
- Aromatic cedar repels insects naturally
❌ Cons:
- Viewing window may stress some birds
- Regional availability inconsistent
- Floor removal can be fussy
5. WildYard Cedar Nesting Box
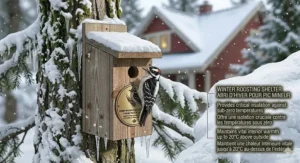
The WildYard box combines functional design with year-round versatility, serving as both breeding habitat and winter roosting shelter. Its 1.5-inch entrance accommodates downy woodpeckers while the deeper cavity provides excellent insulation during harsh Canadian winters.
Key Specifications:
- Premium Western Red Cedar
- 1.5″ entrance hole
- Extra-deep cavity (12-14 inches)
- Pre-drilled mounting holes
Canadian Pricing: $45-60 CAD on Amazon.ca, with Prime shipping available to most Canadian addresses. Price fluctuates seasonally, with best deals in late summer.
Customer Feedback from Canadians: Alberta birders report consistent winter roosting by downy woodpeckers during -30°C cold snaps. The deeper cavity provides superior insulation compared to shallow boxes, making it particularly valuable in Prairie provinces where temperature extremes test equipment limits.
✅ Pros:
- Deep cavity excellent for winter roosting
- Prime shipping available across Canada
- Cedar ages gracefully in harsh weather
❌ Cons:
- Depth may intimidate first-time nesters
- Heavier than standard boxes
- Seasonal price variations
6. All Things Cedar Handcrafted Bird House
From a well-established British Columbia manufacturer, All Things Cedar produces sustainably-sourced Western Red Cedar houses that showcase West Coast craftsmanship. While they offer various models, their customizable options allow you to specify entrance hole size perfect for downy woodpecker breeding habitat.
Key Specifications:
- Sustainably-sourced BC Western Red Cedar
- Custom entrance sizes available
- Bevelled edges and countersunk screws
- Natural finish (no stains or sealants)
Canadian Pricing: $60-85 CAD depending on customization, ordered directly from allthingscedar.ca. Free shipping across Canada on orders over $99 CAD.
Customer Feedback from Canadians: Vancouver Island customers praise the exceptional build quality and attention to detail. The natural cedar aging process creates beautiful silver-grey patina while maintaining structural integrity through coastal rain seasons. Custom sizing allows optimization for specific woodpecker species in your region.
✅ Pros:
- Customizable for precise specifications
- Premium BC craftsmanship
- Sustainable forestry practices
- Free shipping threshold reasonable
❌ Cons:
- Custom orders take 2-3 weeks
- Premium pricing tier
- Natural finish requires acceptance of weathering
7. DIY Cedar Nest Box Kit (Materials from Canadian Retailers)
For the hands-on birder, building your own downy woodpecker nest box with wood chips from local Canadian lumber yards offers unbeatable value and complete customization. Using plans from Cornell Lab of Ornithology or Washington Department of Fish and Wildlife, you can create a cavity nesting box woodpecker design perfectly suited to your local conditions.
Required Materials:
- 3/4″ untreated cedar board (rough-cut preferred)
- 1.5″ hole saw or spade bit
- Outdoor wood screws
- Wood chips for interior fill
Canadian Pricing: $15-25 CAD for materials from Home Depot, Rona, or local lumber yards. Tools may add $30-50 if not already owned.
Customer Feedback from Canadians: DIY enthusiasts across Canada report high satisfaction and strong bird acceptance rates when following proper dimensions. An Ottawa-based birder built six boxes for under $100 CAD total, establishing a neighbourhood woodpecker corridor that attracted multiple nesting pairs.
✅ Pros:
- Unbeatable cost per unit
- Complete control over specifications
- Rewarding hands-on project
- Perfect for multiple installations
❌ Cons:
- Requires basic carpentry skills
- Time investment 2-4 hours per box
- Need tools if not already available
✨ Don’t Miss These Exclusive Deals!
🔍 Transform your backyard into a woodpecker sanctuary with these carefully selected nesting boxes available across Canada. Click on any highlighted product above to check current pricing and availability on Amazon.ca or from Canadian retailers. These proven designs will help you create authentic natural cavity nesting requirements your local downy woodpeckers will love!
Understanding Downy Woodpecker Natural Cavity Nesting Requirements 🌲
When you watch a downy woodpecker drumming against dead tree bark, you’re witnessing thousands of years of evolutionary perfection. These birds didn’t randomly decide to excavate cavities—their entire biology revolves around specific nesting requirements that artificial boxes must replicate to succeed.
According to Wikipedia’s comprehensive overview, downy woodpeckers naturally excavate nest cavities 2.4 to 15.3 metres above ground in dead or decaying trees. The male typically handles about half the excavation work, pecking in 20-minute sessions throughout daylight hours. This process takes two to three weeks and creates a chamber roughly 12-15 cm wide and 20-30 cm deep—dimensions that inform optimal nest box design.
What makes these natural cavities so perfect? The entrance hole averages 1.5 to 1.875 inches in diameter, small enough to exclude larger competitors like starlings or red-bellied woodpeckers, yet accommodating for the downy’s compact size. The cavity widens toward the bottom, creating room for 4-5 eggs and an incubating parent. Most importantly, the soft heartwood allows excavation while harder sapwood provides weather protection—a dual-layer system difficult to replicate artificially.
In Canadian forests from Newfoundland to British Columbia, downy woodpeckers show remarkable adaptability in tree selection. They favour poplars, birches, and ashes with broader leaves that create forest openings, but they’ll excavate almost any species with suitable decay. Dead fence posts historically served as important nesting sites across Prairie provinces, though the shift from wooden to metal posts has reduced these opportunities—making artificial boxes increasingly important.
The timing matters tremendously in Canada’s climate zones. Downy woodpeckers begin drumming and territory establishment as early as February in southern regions, with cavity excavation starting in March or April. Eggs arrive between late April and June depending on latitude, followed by a precise 12-day incubation period where both parents take turns. Understanding this schedule helps you install boxes by late winter, giving woodpeckers time to discover and claim them before breeding urgency peaks.
Woodpecker House Interior Design: What the Birds Actually Need 🏠
I’ve made plenty of mistakes with birdhouse interior design over the years. My first downy woodpecker box looked beautiful from the outside—stained cedar, decorative roofline, perfectly plumb installation. The birds ignored it completely. Here’s what I learned about woodpecker house interior design through trial, error, and some conversations with ornithologists at my local nature centre.
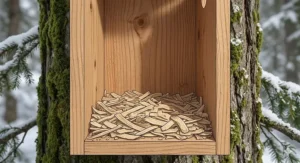
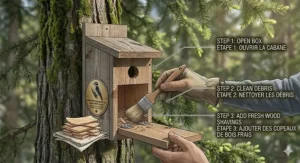
The Wood Chip Secret: This detail separates informed birders from hopeful beginners. Woodpeckers don’t build traditional nests with twigs and grass. Instead, they prefer cavities filled with wood chips that they can “excavate” themselves. Research from the Cornell Lab of Ornithology confirms that packing boxes tightly with wood shavings triggers instinctive excavation behaviour. Use pine or cedar shavings (available at pet stores as small animal bedding), tamped firmly to create a “soft-solid” composition. This psychological trick makes artificial boxes feel like natural tree cavities.
Interior Walls Matter: Smooth interior surfaces doom fledglings. Baby woodpeckers need textured walls to climb from the cavity floor to the entrance hole before their first flight. The best boxes feature scored or roughened interior surfaces—either naturally rough-cut cedar or deliberately scratched smooth wood. Without grip, nestlings struggle to escape and may die in the cavity despite being physically capable of flight.
Ventilation Without Drafts: Canadian temperature swings demand careful air circulation. Drill 3-4 small holes (1/4 inch diameter) near the roof peak for hot air escape during summer heat waves, but avoid creating cross-drafts that chill eggs. Similarly, 2-3 drainage holes in the floor prevent rainwater accumulation without creating updrafts. The balance protects against both Ontario’s humid summers and Alberta’s sudden cold snaps.
Depth and Width Ratios: Downy woodpeckers prefer cavities about 8-12 inches deep with a 4×4 inch floor. This specific ratio accommodates adults turning around, eggs nestled safely, and fledglings exercising wing muscles. Shallower boxes feel exposed; deeper ones trap heat dangerously. Width beyond 5 inches allows eggs to roll away from the incubating parent’s warmth, while narrower confines stress adults.
Cleaning Access Essentials: Any woodpecker breeding habitat must include easy cleaning access for late-season maintenance. Side-opening, front-opening, or roof-hinged designs all work, but the mechanism must be secure against predators while remaining simple for annual cleanouts. Downy woodpeckers rarely reuse old nests, preferring fresh cavities each season, so removing previous year’s material encourages repeat nesting.
Light Control: Unlike some cavity nesters, downy woodpeckers tolerate minimal light entering their nest chambers. The small entrance hole provides adequate illumination for parental care without creating the exposed feeling that would attract predators’ attention. Avoid boxes with viewing windows unless you can cover them during breeding season—the additional light stresses some birds despite being convenient for observation.
Pileated Woodpecker House Size vs. Downy Specifications 📏
Understanding the dramatic size difference between pileated and downy woodpeckers prevents costly mistakes when selecting or building nesting boxes. I learned this lesson after assembling a massive pileated-sized box hoping to attract any woodpecker species—only to realize I’d created real estate no downy would ever consider.
Size Comparison Basics: Pileated woodpeckers measure 16-19 inches from beak to tail, roughly the size of a crow. Downy woodpeckers measure just 5.5-7 inches—smaller than a cardinal. This dramatic size difference translates directly to nesting requirements that don’t overlap despite both species being cavity excavators.
Entrance Hole Dimensions:
- Pileated woodpecker: 3.5 to 4 inches diameter (sometimes larger)
- Downy woodpecker: 1.25 to 1.5 inches diameter
That inch-and-a-half entrance on a downy box wouldn’t even accommodate a pileated’s head. Conversely, downy woodpeckers feel vulnerable in oversized cavities where predators might enter.
Interior Cavity Depth:
- Pileated woodpecker: 20-24 inches deep minimum
- Downy woodpecker: 8-12 inches deep optimal
Pileated boxes resemble tall shipping tubes, providing the dramatic vertical space these crow-sized birds require. Downy boxes are proportionally shallower, matching the modest chambers they’d excavate in thin dead limbs.
Floor Dimensions:
- Pileated woodpecker: 8×8 inches or larger
- Downy woodpecker: 4×4 inches ideal
The floor space difference reflects body mass and egg clutch variations. Pileated woodpeckers need room to manoeuvre their substantial bulk, while downy woodpeckers prefer cozy confines that concentrate body heat for incubation.
Mounting Height Recommendations:
- Pileated woodpecker: 15-25 feet above ground
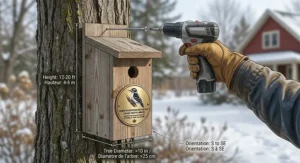
- Downy woodpecker: 6-20 feet above ground (12 feet ideal)
Pileated woodpeckers naturally excavate high in mature forest trees, requiring tall poles or ladder placement. Downy woodpeckers nest at more accessible heights, particularly in forest edges and suburban settings where tall dead snags are scarce.
Practical Canadian Considerations: In mixed woodlands across Canadian provinces, you might reasonably host both species by installing appropriate boxes at different heights and locations. A pileated box at 20 feet on a forest edge tree won’t compete with a downy box at 10 feet in your backyard, as these species occupy different ecological niches despite sharing cavity-nesting behaviour.
Installation and Placement Strategies for Canadian Climates 🧭
The difference between an occupied woodpecker box and an ignored one often comes down to placement details most people overlook. After moving my first box three times before finally achieving success, I’ve developed a systematic approach that accounts for Canada’s unique climate challenges and regional variations.
Compass Orientation Matters: Face entrance holes east or southeast in most Canadian regions. This orientation catches gentle morning sun that warms the cavity after cold nights, while avoiding harsh afternoon heat and prevailing westerly weather systems. In British Columbia’s coastal areas where Pacific weather dominates, south-facing entrances work better. Prairie provinces with intense summer sun benefit from eastern exposures that minimize afternoon heat stress.
Height Strategies by Region: While 12 feet represents the optimal mounting height across Canada, regional adjustments matter. In Ontario and Quebec’s deciduous forests with active raccoon populations, mount boxes at least 15 feet high on predator-baffled poles. In northern British Columbia or Alberta foothills where human activity is sparser, 8-10 feet suffices and makes maintenance more practical.
Tree vs. Pole Mounting: Both work, but with trade-offs specific to Canadian conditions. Tree mounting provides natural camouflage and multiple anchor points, ideal in stable mature forests. However, trees sway during chinook winds in Alberta or Atlantic gales in Maritime provinces, potentially stressing nesting birds. Metal or wooden poles offer rock-solid stability and easier predator-baffling but require guy-wires in areas with frost heaving. I use 4×4 cedar posts set 3 feet deep with concrete collars to prevent frost-jacking in Ontario clay soil.
Predator Protection Essentials: Canadian woodpecker boxes face threats from raccoons, squirrels, cats, and occasionally martens depending on region. Install cone-shaped baffles 4-5 feet below boxes on poles, or wrap tree trunks with 2-foot metal collar guards. The entrance hole’s metal guard prevents gnawing enlargement—particularly important given how industrious red squirrels can be across Canada’s boreal forests.
Distance from Feeders: Position woodpecker nesting boxes 30-50 metres from active feeding stations. While downy woodpeckers readily visit suet feeders, they prefer nesting privacy away from the commotion. This separation also reduces conflict with aggressive species like blue jays that dominate feeding areas but generally ignore distant nest boxes.
Microclimate Considerations: In your yard’s microclimates, choose locations with partial shade from deciduous trees. Full sun overheats boxes during July heat waves even in northern provinces, while deep shade stays too cool for eggs during chilly May mornings. Edge habitats where forest meets lawn or garden provide ideal foraging proximity—woodpeckers nest where they feed, so nearby dead snags and mature trees improve occupancy rates dramatically.
Multi-Box Strategy: Don’t limit yourself to one box. Downy woodpeckers maintain territories of 1-2 hectares, so properties over half an acre can support multiple pairs if boxes are spaced at least 50 metres apart. I run three boxes on my Ontario property: one in the front yard oak grove, one along the back fence line, and one in the side yard near old apple trees. Different pairs claim different boxes in different years, with some boxes serving as roosting sites rather than breeding chambers.
Seasonal Maintenance Calendar for Canadian Woodpecker Boxes 📅
Proper timing of maintenance tasks makes the difference between boxes that host woodpeckers for years versus those that deteriorate or fail. Canada’s distinct seasons create natural windows for specific activities, and I’ve learned to work with climate patterns rather than against them.
Late Winter (February-March): This critical period catches downy woodpeckers during territory establishment but before actual nesting. Inspect boxes for winter damage—check that roofs remain secure after snow loads, drainage holes haven’t plugged with ice, and entrance holes haven’t been enlarged by squirrels during winter roosting. Replace any wood chips that have compacted or gotten damp. In southern Ontario, I complete these tasks by early March; in northern Alberta, early April is more realistic as snow finally clears.
Spring (April-May): Hands off! Once drumming and courtship displays intensify, avoid disturbing established territories. Monitor from a distance using binoculars to confirm occupancy without approaching boxes. If you notice a box hasn’t attracted interest by mid-May, consider relocating it to a better site for next season—but leave it in place for this year as backup roosting habitat.
Summer (June-August): Continue distance monitoring as eggs hatch and fledglings develop. You might hear nestlings’ begging calls from 20 feet away as they grow louder and more insistent. Resist the urge to check inside—parental woodpeckers may abandon if repeatedly disturbed. However, do check that entrance holes remain secure and predator guards haven’t loosened during storms. Late summer (late August) marks the earliest safe time for interior inspection once fledglings have departed and parents have stopped feeding them.
Fall (September-October): This is your primary maintenance window. Remove old nesting material, inspect for damage, clean interior surfaces with a stiff brush (no chemicals—just mechanical cleaning), and check all hardware. Replace wood chips with fresh material. Tighten loose screws before winter. In Maritime provinces, complete this work by early October before wet fall weather. Prairie provinces can work into November during extended dry autumns.
Winter (November-January): Canadian winters transform nest boxes into critical roosting sites. Downy woodpeckers often use boxes for overnight shelter during extreme cold snaps, conserving energy they’d otherwise spend excavating temporary roost holes. Leave boxes undisturbed through winter even if you notice regular roosting activity. One February morning in Manitoba, I observed a downy woodpecker emerge from a box at dawn when temperatures hit -28°C—that box likely saved significant energy overnight.
Regional Timing Adjustments: British Columbia’s milder coastal winters allow maintenance work through December in some years. Northern Ontario and Quebec should complete fall maintenance by mid-September before freeze-up. Prairie provinces benefit from late November maintenance during chinook warm spells when conditions permit comfortable outdoor work.
Comparison: Wooden vs. Alternative Materials for Canadian Weather ⚖️
| Material | Insulation | Rot Resistance | Winter Performance | Lifespan (Canada) | Cost (CAD) | Best For |
|---|---|---|---|---|---|---|
| Western Red Cedar | Excellent | Superior | Excellent | 15-20 years | $45-85 | All Canadian climates |
| White Pine | Very Good | Good | Very Good | 10-15 years | $35-60 | Drier inland regions |
| Composite/Recycled | Good | Excellent | Good | 20+ years | $50-90 | Low maintenance preference |
| Plywood (exterior grade) | Fair | Fair-Poor | Fair | 5-8 years | $20-35 | Budget/temporary installations |
| Plastic/Resin | Poor | Excellent | Poor | 15-20 years | $30-55 | Not recommended for woodpeckers |
After testing various materials across Canadian weather extremes, I’ve developed strong opinions about what works and what fails. The table above summarizes years of experience, but the nuances matter more than the raw data.
Cedar’s Canadian Advantage: Western Red Cedar dominates woodpecker box construction for excellent reasons specific to our climate. Its natural oils repel insects and resist rot even during Ontario’s humid summers or British Columbia’s endless rain. More importantly, cedar provides superior insulation during Prairie winters when temperatures plunge to -40°C. A cedar box maintains 5-8°C warmer interior temperatures compared to plastic alternatives—meaningful when roosting woodpeckers conserve every calorie overnight.
The Composite Controversy: Recycled plastic-wood composites promise maintenance-free longevity and appeal to environmentally conscious birders. However, they fail woodpeckers in a subtle but critical way: poor insulation. Summer heat in southern Ontario can push interior temperatures dangerously high in composite boxes, while winter cold penetrates readily. Birds evolved selecting natural wood cavities for their thermal properties, and artificial materials disrupt this equation.
Pine’s Acceptable Alternative: Eastern White Pine offers legitimate budget-conscious alternative where rot isn’t severe. In drier regions like southern Alberta or interior British Columbia, untreated pine boxes last 10-15 years with reasonable performance. However, Maritime provinces’ coastal moisture or Ontario’s wet spring seasons deteriorate pine rapidly without annual maintenance. I use pine for experimental boxes or temporary installations, but invest in cedar for permanent stations.
Attracting Downy Woodpeckers Year-Round: Beyond the Nest Box 🌿
Installing a perfect downy woodpecker nesting box represents just one element in creating compelling habitat. These birds evaluate your entire property when choosing territories, and the supporting features often determine success more than box specifications alone.
The Dead Wood Requirement: This might be the hardest sell to neighbours and spouses, but it’s non-negotiable for serious woodpecker habitat. Leave dead standing trees (snags) when safe, or create artificial snags from fallen trees mounted vertically. Downy woodpeckers forage on dead wood for beetle larvae, carpenter ants, and wood-boring insects that comprise 75% of their diet. A single dead apple tree in my Ontario yard hosts more downy woodpecker activity than any feeder—they drum on it, excavate test holes, and hunt insects constantly from March through November.
Winter Feeding Strategies: While nest boxes attract breeding pairs, winter feeding establishes year-round residency. Offer suet cakes (beef fat-based, not vegetable alternatives that freeze poorly), peanut butter mixtures, and black oil sunflower seeds. Mount feeders on tree trunks rather than hanging from wires—woodpeckers prefer vertical foraging positions. I’ve watched downy woodpeckers visit the same suet feeder location for eight consecutive winters, suggesting learned behaviour passes between generations.
Water Sources Through Canadian Seasons: Moving water attracts woodpeckers more effectively than standing birdbaths. In summer, a small recirculating fountain provides drinking and bathing opportunities. Winter water sources are trickier—heated birdbaths work but require electricity and monitoring. I’ve had success with solar-heated water dishes during shoulder seasons (October-November and March-April) when ground water freezes but daytime temperatures still reach positive values.
Native Plant Landscaping: Downy woodpeckers forage on specific plant species common across Canada. Staghorn sumac provides berries and hosts insects woodpeckers hunt. Crabapple trees offer fruit and attract beetles to decaying branches. Virginia creeper vines shelter insects and provide occasional seeds. When I replaced ornamental shrubs with native alternatives five years ago, woodpecker activity increased noticeably—they now forage on serviceberry branches and hunt insects on wild elderberry stems.
Pesticide-Free Promise: This is where property management philosophy matters profoundly. Downy woodpeckers consume tremendous quantities of tree-damaging insects including tent caterpillars, bark beetles, and corn earworm larvae. Chemical pesticides eliminate their food supply while potentially poisoning birds directly or through bioaccumulation. My yard hosts what neighbours call “excessive” numbers of caterpillars some springs, but downy woodpeckers, chickadees, and nuthatches devour them naturally without chemical intervention.
Common Installation Mistakes and How to Avoid Them ⚠️
I’ve made almost every possible woodpecker box mistake over two decades of backyard birding. These failures taught me more than successes ever could, and I’m sharing them so you can skip the learning curve I endured.
Mistake #1: Installing Too Late in Spring The error: Mounting boxes in May when tree leaves emerge and birds’ drumming accelerates. The reality: Downy woodpeckers begin territory establishment in February-March across most Canadian regions. By May, pairs have already claimed sites and begun excavation. Fix: Install boxes by late February in southern regions, early March further north. This timing allows birds to discover boxes during early territory scouting before committing to natural cavities.
Mistake #2: Excessive Decoration The error: Painting boxes bright colours, adding perches below entrance holes, or installing decorative elements. The reality: Downy woodpeckers evolved avoiding conspicuous nesting sites that attract predators’ attention. They ignore brightly painted boxes and rarely use perches (which actually help predators access entrances). Fix: Leave cedar natural to weather grey, or use only natural wood stains. Eliminate perches completely—woodpeckers cling directly to entrance holes using their specialized feet and tail.
Mistake #3: Inadequate Predator Protection The error: Mounting boxes on tree trunks without baffles, assuming height alone deters raccoons and cats. The reality: Raccoons climb 60-foot trees routinely, reaching even “safely” mounted boxes. Cats also climb remarkably well. Fix: Install conical metal baffles 4-5 feet below boxes on poles or tree trunks. The slick angled surface prevents climbing while looking relatively unobtrusive once weathered.
Mistake #4: Wrong Entrance Orientation The error: Facing entrance holes north toward prevailing summer winds or west toward afternoon storms. The reality: Northern exposures never warm adequately during spring’s cool nights when eggs require constant incubation. Western exposures funnel rain directly into cavities during typical Canadian storm patterns. Fix: East or southeast orientations across most provinces, adjusting slightly for regional wind patterns.
Mistake #5: Neglecting Interior Roughness The error: Using smooth plywood or sanded lumber inside boxes, prioritizing aesthetic appearance. The reality: Nestling woodpeckers cannot climb smooth surfaces to reach entrance holes before fledging, causing deaths even in otherwise successful nests. Fix: Use rough-cut lumber, score smooth surfaces with a saw blade or chisel, or install small strips of hardware cloth on interior walls to provide grip.
Mistake #6: Improper Drainage The error: Omitting floor drainage holes or drilling them too small to function effectively. The reality: Spring rains can flood sealed boxes, drowning eggs or chilling nestlings fatally. Fix: Drill 3-4 drainage holes (1/4 inch diameter minimum) in floor corners, and slightly tilt the floor during construction so water naturally flows toward drainage holes rather than pooling centrally.
Frequently Asked Questions About Downy Woodpecker Nesting Boxes 🍁
❓ What is the ideal entrance hole size for a downy woodpecker nesting box in Canada?
❓ When should I install woodpecker nesting boxes in Canadian climates?
❓ How much does a quality downy woodpecker nesting box cost in Canada?
❓ Can I use the same box for downy woodpeckers and chickadees?
❓ What should I fill the downy woodpecker nest box with?
Conclusion: Creating Sanctuary for Canada’s Smallest Woodpecker 🐦
The rhythmic tap-tap-tap of a downy woodpecker exploring your backyard isn’t just pleasant sound—it’s evidence of successful habitat creation that benefits entire ecosystems. These industrious birds excavate cavities used by chickadees, nuthatches, and flying squirrels long after original occupants depart. They consume thousands of destructive insects annually, protecting your trees naturally without chemical intervention.
Installing a properly designed downy woodpecker nesting box represents an investment in biodiversity that pays dividends across seasons and years. From the excitement of first occupancy to watching fledglings take hesitant flights from entrance holes, you’re witnessing ecological processes that shaped North American forests for millennia.
Canada’s diverse landscapes—from British Columbia’s coastal rainforests to Ontario’s deciduous woodlands to Quebec’s mixed boreal forests—all support downy woodpecker populations that adapt to local conditions while maintaining core nesting requirements. By understanding these requirements and providing thoughtfully designed artificial cavities, you compensate for habitat loss that urbanization inevitably creates.
The seven products reviewed above represent proven options available to Canadian birders in 2026, each with specific strengths matching different needs and budgets. Whether you invest in premium handcrafted cedar from Urban Nature Store, opt for budget-friendly multi-packs from SISTERBIRD, or build your own following time-tested plans, the most important element remains your commitment to proper placement, seasonal maintenance, and supporting habitat features.
Your woodpecker box won’t succeed in isolation. Combine it with suet feeders, preserve dead standing wood when safe, establish pesticide-free yards, and plant native species that support insect populations woodpeckers hunt. This holistic approach transforms your property from simple bird housing to genuine sanctuary.
Next spring, when you hear drumming against your newly weathered cedar box and glimpse that distinctive black-and-white pattern excavating entrance holes, you’ll understand why thousands of Canadian birders invest time and resources into woodpecker habitat. You’re not just attracting birds—you’re participating in conservation at the most immediate, personal scale possible.
The downy woodpecker waiting to discover your carefully placed, properly oriented, predator-protected box doesn’t care about aesthetics or cost per unit. It’s searching for one thing: a safe cavity that replicates the decaying snag its ancestors relied upon for thousands of generations. Provide that, and you’ll earn front-row seats to one of nature’s most fascinating breeding cycles, played out annually in your own backyard.
Recommended for You 📚
- How to Prevent Sparrows Bluebird House: 7 Solutions (2026 Canada)
- 7 Best Bluebird Nesting Box Ontario Options 2026
- 7 Best Chickadee Houses in 2026: Perfect Entrance Hole Size Guide Canada
Disclaimer: This article contains affiliate links to Amazon.ca and Canadian retailers. If you purchase products through these links, we may earn a small commission at no additional cost to you. All product recommendations are based on genuine research and Canadian customer feedback.
✨ Found this helpful? Share it with your friends! 💬🤗